
Michael
Dad & NerdLayout
We've different zone, which - of course - are overlapping in such a tiny space.
Quickly it was clear, that each cabinet, each corner needs to have a double use. Otherwhise a L2H2 would be simply too small. So we decided, what needs to be easily accessable as primary use. And by which action it can adopted for a secondary use.
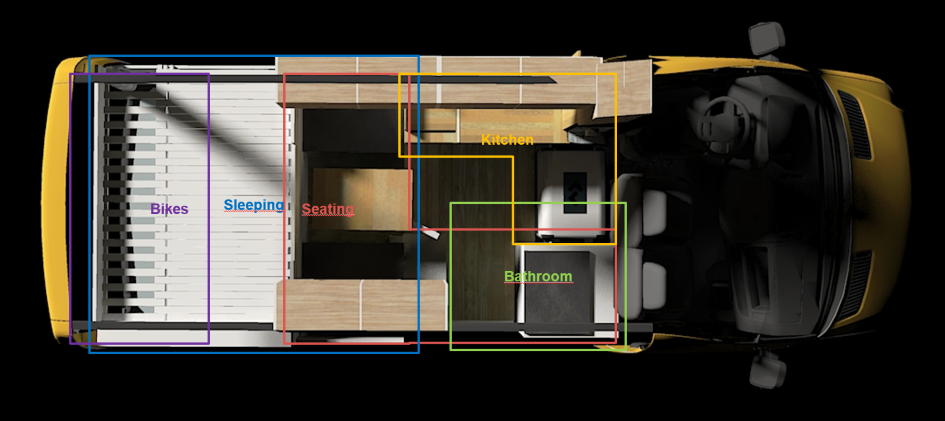
This approach worked for us just and only once we've switched from a 2D-planning to the third dimension. There was no other way to get something usefull out of it.
But now we've got other constrains: how much space you need for ergonomical reasons.
Lets take an example.
- The water tanks* lay on the ground, so the minimum plateau-step is given. Now we had to check, at which height you still feel comfortable if your feets are on the plateau up to the seat height. Lets keep that mind as a number X.
- Apparently other topic: In the Garage I need a raised floor for my tools & recovery gear. On top, I need space for bikes* (max. front wheel disassabled). That gives the minimum high for the bed - lets plan a bit buffer. But then you imagine to sit on the bed (including the mattress!) and become aware - you can't go much higher, otherhise you're banging your head on the top. So the optimum height seems to be Y.
- Now you check, what's the distance between Y and X and you realize: my lovely daugter will simply not fit into her sleeping area... and she is a really small person yet.
So for us it was pretty important to have a 3D-model to optimize all little pieces (we've made list upfront), before even thinking to cut the first board. Even it took weeks it was good. (Little spoiler alert: reality will hit you anyway.)
Functions
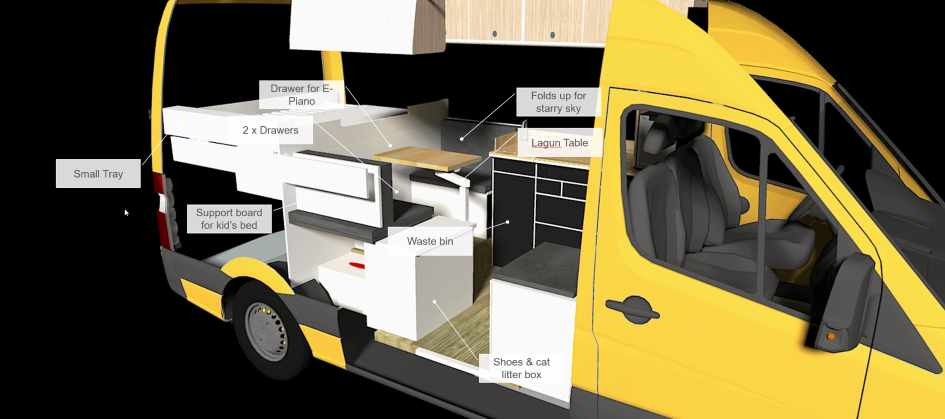
In following illustrations you can figure out some of the more important functions we built something for.
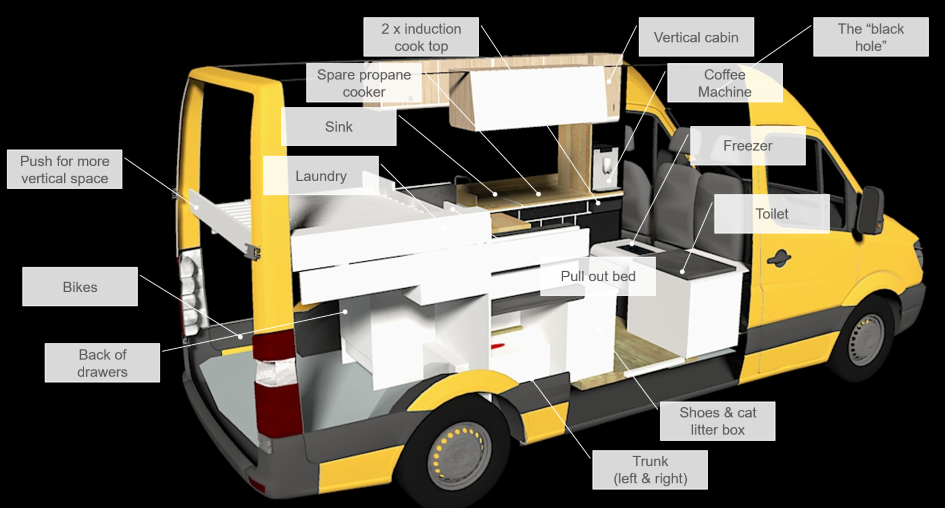
The laundry slot was actually a nice idea. It falls into a sack in the garage. No smell, no hazzle. We are cooking primary with our electrical induction cooktops*. But if the battery* is dead for whatever reason, we can make some hot tea or soup at our reserve gas cooker*. And yes, I'm a nerd - I wanted my lovely coffee machine* with me at holidays. ("Push for more vertical space" is for my wife. She's a very good painter (Check out her website) and we need to be able to transport large paintings.)
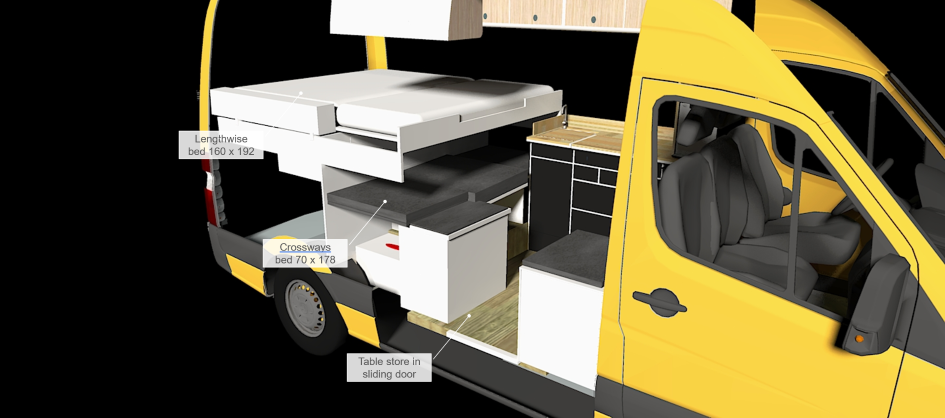
Here you see the different setup for daytime (above) and nighttime (below). Double use: the backrest is also the support board for the kids bed incl. a piece of mattress. The other backrest just folds up, once the top-bed is pulled out and has a nice LED star sky*. BTW: the Lagun table* was perfect for our setup. You can turn it around every way that we can reach the seats easily.
For nighttime setup, you simply store the table in the sliding door, put the restback into place and pull out the upper bed and mattress. Pretty quick action and you're ready to sleep. Even in that setup we would be able to eat if we just plugin the Lagun table*. We can sit on the shoe and toilet* cabinets. We have also one additional folding seat* behind the driver seat for maximum flexibility.
Overall this layout is working well for us.
Materials
Furnitures are built out of birch multiplex panels. This material is particular strong, can't be easily broken, if it breaks it does not produce any splitter (in case of a crash), doesn't works so much at changing humidity, but has a bit sensitive surface you need to treat well.
I used 15mm (parts of the floor, top cabinets, structural supports, partition wall between garage and living area, kitchen countertop), 12mm (some drawers some kitchen walls), 9mm (most drawers, kitchen walls) and sometimes even 6mm (seperators, drawers) depending on the anticipated structural load. It's heavy, so you should chose the thickness wisely.
Side and ceiling panels are poplar plywood (4mm) since there is no constructional strength required. This material is even more sensitive, but really lightweight. I used it also for most of the drawer bottoms.
In total I bought 40m² wood and spent 1.900 € overall for construction material. Additionally what I totally under-estimated was the hardware (850 €) and painting (800 €). For screws only I spent additional 550 €. What a nightmare.
Processing
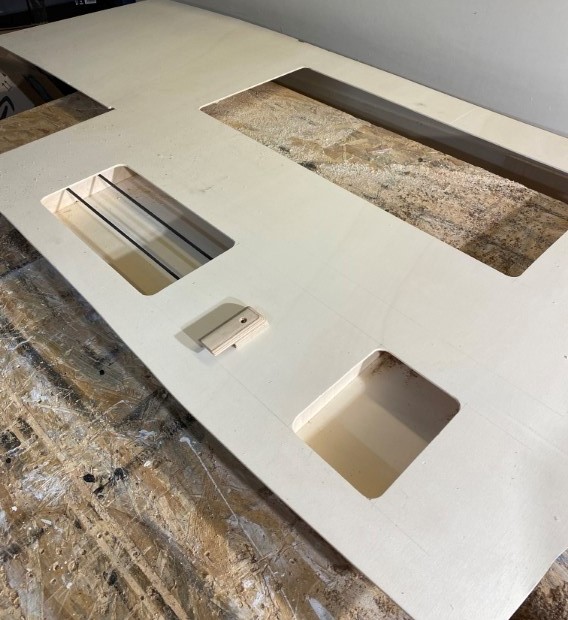
Raw cuts with the jigsaw* and final cut with a top head router* with stops & clamps* was the best way for me with the most clean results me myself could achieve.
Every piece was painted from all sides at least two times (black*, white* & blank*). This prevents the wood from bending immediately or later in changing humidity levels in- and outside and hardens a bit the surface.
And the golden rule was: measure twice, and one more time before you make a cut. In complex areas I worked with cupboards to create templates, cut the wood roughly and slimmed it down until it fit perfectly.
I tried to utilize every little corner. The top cabinets have a back wich is really complex. But a few centimeter gives you much more options. At the kitchen didn't built any back board since you'll never see due to the drawers.